Tuesday, October 30, 2012

SUSHI RICE SALAD


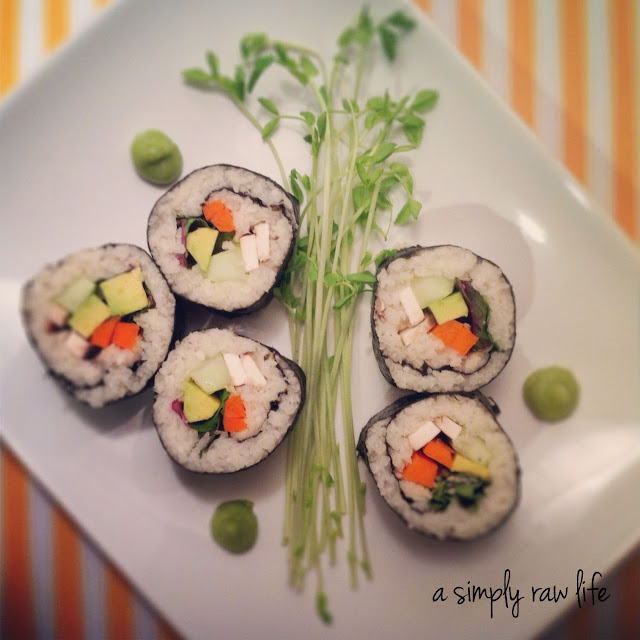
You may have seen my raw sushi and vegan hand roll post yesterday on Instagram, which was very tasty by the way.  I didn't have quite enough time to take tutorial photos of the sushi rolling process, so unfortunately, I will have to do a post on that another time.  But, as I was rushing to pack our lunches this morning I said "Ah ha!"  Of course, I will use the left overs from last night to make a sushi rice salad.  Perfect.  You can do this with the acutal sushi rice as well to make it vegan.  Super easy and super yummy!  I love these simple Japanese inspired dishes that are healthy and full of flavor.
 

SUSHI RICE SALAD

 
To make the jicama rice, take 1 medium size jicama and peel the skin off, cut them into small cubes, and process them in the food processor until you have small rice like pieces.  Then put the jicama in a cheese cloth and squeeze all the liquid out of the jicama.  Put the jicama in a bowl and season it with 2-3 tablespoons of sushi rice vinegar and set aside.
 
Julienne cut your favorite vegetatables to top the rice salad and season with a mixture of wasabi and your favorite type of  "soy sauce".  Finally garnish with cut nori strips and sesame seeds if you have some.  Super simple.
 
Enjoy!


Sushi Rice Vinegar


I will be working on a post for these soon...


Join the discussion!


Do you have a favorite Sushi recipe? We would love to hear what it is! Share it in the comments below. Links are welcome.


Monday, October 29, 2012

REFLECTING...


I apologize for not having a recipe post today.  I am still reflecting on the fabulous weekend I had at The Matthew Kenney Academy's Weekend Intensive Raw Cooking Course.  And I am also trying to catch up today.  The course really accomplishes the mission statement quoted above.  I am so inspired.  Inspired to continue on this course of plant based cooking and eating and to continue to create and share more recipes capturing the great flavors nature has to offer us.   I'll be posting about my experience a little more later this week I hope. 
 
Hope you have a great week!


Friday, October 26, 2012

KALEIDESCOPE CHARD PESTO WITH WHOLE WHEAT SPAGHETTI


Italian food is one of those foods that you can fall in love with all over again, especially after you are able to travel to the actual country and eat their food, in their environment.  I love this version of pesto I made!  Making it with Chard is really delicious.  A twist on your regular pesto.  For this recipe, I got my inspiration from the folks at Happyolks.  I realy, really love their style of cooking and photography.  So fresh and fun.  Such a super simple easy recipe... here's the run down...


KALEIDESCOPE CHARD PESTO with WHOLE WHEAT SPAGHETTI


Ingredients:

 
1 large bunch kaleidescope chard (lightly de-ribbed), for a shortcut I used a bag of kaleidescope chard
1/3 cup olive oil
2/3 cup pine nuts
2 lemons, juice of
1 cloves garlic
dash of salt
1 tsp paprika
1/3 cup nutritional yeast
1/2 package whole wheat spaghetti

In a large food processor, combine all the ingredients and process until completely pureed. Toss pesto with cooked pasta.  So easy!

Serves 2


Enjoy!
 

Join the discussion!


Do you have a favorite Pesto recipe? We would love to hear what it is! Share it in the comments below. Links are welcome.


Thursday, October 25, 2012

MATCHA GREEN TEA LATTE WITH ALMOND MILK


It's finally cooling down here in Los Angeles and it's making me want lattes more and more.  One of my favorite lattes is Matcha Green Tea.  Of course you can go to your favorite coffee and tea place to order it for $4.00 each, but why not make it at home.  Its super easy and tastes just as good.  Don't get me wrong, love going to coffee and tea houses.  There's something about the whole process of going there and hanging out with friends and enjoying a cold winter day.  But this is definitely perfect for those days you don't feel like venturing out.
 
Here's the run down...
 

MATCHA GREEN TEA LATTE

Ingredients:

 
1 teaspoon matcha green tea powder
12 oz almond milk
1 tablesppon agave nectar
 
I used my French Press for frothing the milk...


I love the color of Matcha Green Tea.  Pur 1 teaspoon of the Matcha Green Tea powder into your mug.  Warm the almond milk over the stove until its hot but not boiling.  Pour the almond into the French Press and pump the handle up and down several times until the milk is frothed.  Pour the milk into your mug and stir well.  Add in the agave (you can use more or less depending on your desired sweetness) and stir until everything ins mixed well.  Now it's ready to drink! 
 
Enjoy!!


Join the discussion!


Do you have a favorite Latte recipe? We would love to hear what it is! Share it in the comments below. Links are welcome.


Wednesday, October 24, 2012

RAW ENERGY BAR WITH DATES AND APRICOTS


I really wish these bars would last longer when I make them.  Seriously,  they seem to disappear so quickly and probably so because I love giving these to friends to try.  So far, my first energy bar post has been the most popular.  You can find that recipe HERE
 
What I love about this recipe is that you can literally use any of your favorite nuts, dried fruits or even oatmeal and switch the recipe up to keep it interesting.  And this recipe is what we like to call super simple.


Here's the recipe...
 

RAW ENERGY BARS WITH DATE AND APRICOTS

Ingredients:

 
16 oz pitted dates
1 cup dried apricots
3/4 cup pepitas
3/4 cup cashews
1/4 cup macadamia nuts - optional
3 table spoons chia seeds
 
Note: You can also add 1/2 cup dried shredded coconut, which I think I am going to do next time.

Blend the dates and the apricots in the food processor until blended. It will be very, very sticky. Transfer it into a blow and then mix in all the other ingredients. Wet your hands slightly and knead and fold the ingredients togehter by hand. It will be tough but if you knead and fold it will eventually all be mixed togeher.

Tip, don't put in too many dry ingredients, it will make it more difficult to fold, mold and stick together.

Press the ball of ingredients into a wax paper lined 9" x 13" baking pan. Chill for 1 hour in the freezer and then cut into bars. I like to store these in the refrigerator, it keeps them at a nice firm consistency.

Voila!  I know you will love these and make them as much as I do.

Join the discussion!

Do you have a favorite energy or granola bar recipe? We would love to hear what it is! Share it in the comments below. Links are welcome.


Tuesday, October 23, 2012

VEGAN BAKE SHOP BABYCAKES NYC... NOW HAS AN APP


If you like vegan baked goods check out this little video from BabyCakes NYC... they also have an app now you can download.  Check it out!
 
I  love, love, love their desserts! 
You can find their shops in Los Angeles too!


APPLE BUTTER


Who doesn't like a sweet treat at 3 o'clock in the afternoon?  I know I do especially when I am at work grinding away at the computer.  It's so easy to go to the store and pick up your favorite sweet spread too.  Trader Joes has a so many fabulous treats to try but why not try making your own.  This recipe is so easy you'll wonder why you never tried it before.  This came out so deliciously yummy, you have to try it.  I adapted my recipe from Oh She Glows... I love this recipe.
 
You can use tart or sweet apples or mix them together.  I used sweet.  Also, you can make small or big batches.  So here's what I did:
 

APPLE BUTTER

Ingredients and directions
 
Wash and core 5 apples and chop them up in big chucks.  Place into your slow cooker and cook on high for 4 hours.  You can add a little apple juice to it to help prevent it from sticking.  Stir it a few times throught the cooking time to prevent sticking as well.


After the 4 hours, turn off the slow cooker and mash the apples up with spatual or spoon with the peels on.  At this point they should be soft enough.  It will look like apple sauce.  Let it cool slightly and pour it into a high speed blender and blend until smooth.  You want to make sure you blend in the peels too until it is smooth, so you may have to do it in two batches depending on how much you are making.  It will look like really smooth apple sauce.
 
Blender
 
Back into the slow cooker...
 
There's one last step.  Put the mixture back into the slow cooker and cook on high for 45-75 minutes.  Turn off the heat and add in 1/2 teaspoon cinnamon and juice from 1/2 a lemon.  Let it cool and store in the regrigerator in an airtight container.  The apple butter will thicken up a little in the frig over night.  Makes about 3 cups.


Put the apple butter in glass jars and they become great gifts for friends! 
 

Serving ideas:

I love pairing this up with almond butter and eating it with my favorite bread or even topping this on my favorite oatmeal.  Here I topped it on some oatmeal that I mixed with almonds and craberries.  Delicious!


Enjoy!
 

Join the discussion!

Do you have a favorite recipe apple butter?  How do you eat your apple butter? Share it in the comments below. Links are welcome.


Monday, October 22, 2012

RED QUINOA WITH SUN DRIED TOMATOES & ARTICHOKE HEARTS


Hope your Monday is going well.  You will be able to  find today's vegan recipe over at Family Sponge.  So excited to be featured there!  I will be contributing some of  my favrotite vegan recipes once a month on Family Sponge so stay tuned and follow our friends at Family Sponge and Simple Green Smoothies.
 
More to come...
 
Have a great week and enjoy!


Saturday, October 20, 2012

JAPANESE INSPIRED SALAD WITH BEETS, HARICOT VERTS AND HEIRLOOM TOMATOS WITH SWEET SESAME SEAWEED


It's interesting how, once you start eating healthy, especially raw, your body craves it.  I love that feeling.  Tonight I was craving something crisp and tangy.  I also wanted to use the Sweet Sesame Seaweed I picked up from Trader Joe's the other day.  So perfect, I thought,  let's do a Japanese inspired salad with a Ponzu sauce!
 
This is super simple and easy.  The only thing is that you will need a few key ingredients to make the ponzu sauce.  This recipe is for a single serving.
 

JAPANESE INSPIRED SALAD WITH BEETS, HARICOT VERTS AND HEIRLOOM TOMATOS WITH SWEET SESAME SEAWEED

 
For the salad
 
12 pieces of haricot verts, french cut
1/2 a beet, peeled and julienned
1/2 of a firm green heirloom tomato, julienned (you can also substitute this with daikon radish or jicama)
1/4 cut Sweet Sesame Seaweed from Trader Joe's (any kind of dried seaweed will work, cut into strips with scissors)
Sesame seeds
 
For the ponzu sauce
 
3 tablespoons fresh lemon juice, more to taste
1 tablespoon fresh lime juice, more to taste
1 tablespoon cup rice vinegar
3 tablespoons good-quality soy sauce or Bragg's Liquid Aminos
1 tablespoon mirin
Pinch cayenne

This is my quick version.  If you are interested in making a full batch check out this recipe on The New York Times Dining and Wine page recipe of the day.

Mix all the ponzu sauce ingredients together in a small bowl.
 
Put each salad ingredient into individual small bowls and pour in equal parts of the ponzu sauce into each bowl and marinade for a few minutes.  Plate each salad ingredient onto a plate in layers, drizzle on more ponzu sauce as desired, sprinkle on the sesame seeds  and seaweed and serve.  Super simple and easy.   
 
Enjoy!


Friday, October 19, 2012

RAW VEGAN: MEXICAN SEASONED VEGGIE MEAT


Obviously, we like tacos over here, so I was very happy when I found this recipe from Judita Wignall in her book Going Raw.  This tastes so good and very much like taco meat that you won't even know the difference.  I love Brazil nuts too so, this recipe is a winner!  My husband couldn't get enough!
 
We wrapped this and all the fixings into a large rainbow chard leaf to complete our raw wrap.  So delicious! 
 
rainbow chard

soak and process the brazil nuts
 
mix the brazil nuts and veggies together


Here's the recipe...
 

RAW VEGAN MEXICAN SEASONED VEGGIE MEAT

INGREDIENTS:

 
2 cups brazil nuts, unsoaked
4 cups finely diced zucchini
1-1/2 cups  minched white or cremini mushrooms
1/2 cup minced onion
1/2 cup minced celery
1/4 cup mexican chilli powder, you can add up to 1/2 cup to add more flavor depending on your taste
1/4 cup lemon juice
1 teaspoon sea salt, less if you are using salted chilli powder
2 clove garlic minced
1/2 teaspoon cayenne pepper
 
Julienne your favorite veggies to include into the wrap.  I used yellow bell pepper, carrors, tomatoes, guacamole, pea shoots and cucumbers.  You can also add shredded cabbage, spinach or romane lettuce. 
 
For the veggie meat, place the brazil nuts into a food processor and grind into a flour.  In a large bowl, combine the brazil nut flour with the zucchini, mushrooms, onion, celery, chili powder, lemon juice, salt, garlic, and cayenne.  Spread the mixture into 2 dehydrator trays lined with non stick sheets and dry at 110 degrees for 1-1/2 hours.  Transfer to mesh dehydrator sheets for another hour.  Do no over dry.  Fill your tacos or wrap and serve!
 
If you save your meat for later and want to warm it up, place the the meat in the dehydrator for 30-60 minutes at 145 degrees before assesmbling.
 
Enjoy!


FUN IN L.A.: BOOK SIGNING WITH JOY CHO OF OH JOY STUDIOS


I was able to add a little diversion to my week last night as my good friend Britney (who is a contributor on this blog and who is 1/2 of the fabulous duo behind Btanjerine) and I were able to take a couple hours and sneak out to meet one of our favorite bloggers in person and have her sign our copies of her book Blog, Inc.  It was held at the West Elm in Los Angeles, CA and the food was catered by Heirloom LA  We also had a chance to meet Interior Designer Emily Henderson of HGTV and a really fabulous Photographer Bonnie Tsang who we also follow in IG and check out her site HERE and her blog HERE.  So, I have to say all in all, it was a really fun night! (I only wish I had taken more photos.)   
 
Happy Friday everyone!


Thursday, October 18, 2012

DETOX + BEAUTY WATER


Refreshing Beauty Water
Written by contibutor Britney Manuel of Btanjerine and A Simply Raw Life.


So as many of you know I am a Pinterest junkie, and amidst my pinning I’ve pinned this recipe for "sassy water" ummmm....several times let’s just say.  So when I saw it the other day for the umpteenth time I decided, “I need to make this!”  To my surprise the blog was in Russian, but you can scroll down until you see some letters you recognize.  You can check it out here.

Let’s admit it, sometimes its hard to drink as much water as one should.  But this snazzier take on a necessary beverage is like a little black dress for your water.  I found it made it easier and more enjoyable to drink my daily allotment of water.  

This water is a great detoxifier and some of the health benefits include:

  • Ginger aids in digestion and can reduce your risk of constipation.


  • Lemon works as a natural diuretic and promotes a healthy pH balance. 


  • Cucumbers contain erepsin, an enzyme that helps your body digest protein and also supports the health of your kidneys due to their diuretic properties. 


  • Chemicals in mint leaves also support digestion. .


For more info on this "sassy water" check out this article here.  It also supports having a flat belly, and i am all for that!

So here are the deets!


DETOX BEAUTY WATER


BITS & PIECES

1 cucumber (peeled + thinly sliced)
1 lemon (peeled + thinly sliced)
1 tsp ginger  (finely chopped)
10 mint leaves


THE PROCESS

Add sliced cucumber, sliced lemon, chopped ginger, and mint leaves to a pitcher.  Add 2 liters of water.  Let it seep for a few hours or overnight et voila!  Refreshing beauty water!

**NOTE: I don’t add the lemon peel because if it seeps for too long in the water it starts to taste bitter.  Also  after I drank all the water,  I refilled the pitcher and let it seep another night.  So I got 2 uses out of it.  Of course the flavor is not as strong as the first batch.

Wednesday, October 17, 2012

BLACKSTRAP MOLASSES + BALSAMIC DRESSING OVER VEGGIES

Blackstrap Molasses + Balsamic Dressing
Written by contibutor Britney Manuel of Btanjerine and A Simply Raw Life.


Spent a wonderful weekend in one of my favorite cities... Ventura California with one of my favorite people JMP.  Her sister was down, and did I mention she is a fabulous cook?  Well she whipped us some tasty creations including this ditty, a balsamic + blackstrap molasses dressing.  We were on the verge of drinking it, it was so good!  Shout out to Tiff! WOOT WOOT!!!  


Blackstrap molasses is wonderfully good for the body.  I first heard of it when I was in the throws of morning sickness.  At the time though the taste was so repulsive that I think that the only thing it helped was me sprint to the bathroom!  This time was a much better experience.  

SOME FACTS

  • Blackstrap molasses is a great source for iron (which is why pregnant women are urged to take it).
  • Blackstrap molasses in comparison to red meat, a well known source of iron, blackstrap molasses provides more iron for less calories and is totally fat-free.
  • Iron is an integral component of hemoglobin, which transports oxygen from the lungs to all body cells, and is also part of key enzyme systems for energy production and metabolism.
  • Blackstrap molasses is a very good source of calcium. Calcium, one of the most important minerals in the body, is involved in a variety of physiological activities essential to life, including the ability of the heart and other muscles to contract, blood clotting, the conduction of nerve impulses to and from the brain, regulation of enzyme activity, and cell membrane function. 
  • Calcium is needed to form and maintain strong bones and teeth during youth and adolescence, and to help prevent the loss of bone that can occur during menopause and as a result of rheumatoid arthritis.
  • Calcium binds to and removes toxins from the colon, thus reducing the risk of colon cancer
  • And because it is involved in nerve conduction, may help prevent migraine attacks. 

I was really impressed by what I found out about this rich dense molasses.  I am going to try adding it to my smoothies.  If you are so inclined, pop on over to the article I found on the topic here


BLACKSTRAP MOLASSES + BALSAMIC DRESSING


THE BITS

1/3 cup balsamic vinegar
1/3 cup blackstrap molasses
juice of 2 lemons
1/4 cup Dijon mustard
1/2 cup olive oil
pepper to taste
6 garlic cloves finely chopped
1/4 cup maple syrup (optional)

THE PROCESS

Pour the lemon juice is a bowl.  Next add the olive oil. Useful tip #101, after pouring the oil in a measuring cup try to get the oil to coat the measuring cup before pouring it into the bowl.  This will ensure that the following ingredients you measure wont stick to the measuring cup because the oil will ease everything out.  Brilliant huh?  Next add all other ingredients and use a whisk to combine.  

Keep in an airtight container for about a month.  But it won’t last that long believe me.  This dressing tastes exquisite over roasted vegetables, on a salad, or over pot stickers.  It can be used as a dip for bread, and I’m thinking about making it to go over a pineapple ginger rice combo, but it really can go over anything you fancy.

Makes 2 cups.
**NOTES:  When I had it the first time it didn't have maple syrup, but I instantly thought it would really be a nice addition.

So the only thing holding this recipe up from being completely raw is the mustard.  I found a link to a recipe that looks really good on homemade raw dijon mustard.  I have not tried it as of yet, but this is the link here


Roasted Veggies with Blackstrap Molasses + Balsamic Dressing

Roasted Veggies

4 carrots
4 potatoes
2 beets
1 cup Blackstrap molasses + Balsamic Dressing 

Throughly wash all veggies, peel, and cut into bite size chunks and place in a bowl.  Pour blackstrap molasses dressing over veggies and mix.  Marinate veggies in dressing for 30 minutes to infuse flavors.  Line a cookie sheet with parchment paper,  and pour veggies and dressing on the sheet.

Bake at 400 degrees for 1 hour.  Flip over after 30 minutes.

Veggies are done when they are tender.  Drizzle more dressing on top before serving.

Makes approximately 6 servings as a side dish


Tuesday, October 16, 2012

QUINOA PATTIES WITH KALE AND SWEET POTATO


I mean sometimes, you just want to put something "meaty" into your mouth.  Who doens't like to make a "burger" type dish with all the fixings?  This is a wonderful vegan / vegetarian burger you can eat as a great burger or even alone with you favorite creamy sauce and a side salad.  I drizzled on my favorite chipotle sauce and it was so good!


QUINOA PATTIES WITH KALE AND SWEET POTATO


INGREDIENTS:

 
1/2 a pound of kale, large stems removed and finely chopped
1 teaspoon salt
1/4 pound sweet potato, steamed, peeled and cut in to small chunks
2 cups quinoa, cooked per instructions
1 small or 1/2 medium yellow onion, finely chopped
3 round tablespoons nutritional yeast
2 tablespoons minced fresh dill
1/2 teaspoon cayenne pepper
1 lemon, juice of
1-1/2 teaspoon lemon zest
3/4 cup garbonzo flour mixed with equal parts water
Extra virgin olive oil
 
You can find my vegan chipotle ranch sauce HERE.
 
Preheat oven to 400 degrees.  Cook quinoa according to directions. Fluff with a fork and set aside.  Combine all the ingredients except the garbonzo flour and water well with your hands.  Mix the garbonzo flour and water in a measuring cup then pour the flour mixture into the quinoa mixture and combine thoroughly.  Wet your hands with water, and form 6-1″ thick quinoa patties. Pat edges of patties to firm up–rewetting hands with water if needed.  Heat a large stove top pan with extra virgin olive oil brown patties for 4 minutes on each side.  Transfer to a baking sheet and bake for additional 15-18 minutes until golden brown and crispy.  Remove from oven, plate, garnish, and serve.

*Optional: for a lower fat version, skip the pan sear and put the patties straight into the oven onto a lightly greased baking sheet. Bake for an additional 10 minutes until cooked through.

I love this recipe because you can definitely change up the ingredients and make different versions. This has defnitely become one of my family's go to recipes.

Enjoy!


Monday, October 15, 2012

VEGAN: ROASTED CAULIFLOWER W/TUMERIC, CUMIN & CURRY

Written by contributor Yumi Payne of Nastukashii.
 
Here's a side dish that has wonderful flavors to wake the palate!  This recipe is from chef Sera Pelle who is also consulting chef at the gastropub Mohawk Bend in Echo Park.  They have a variety of vegan dishes on the menu which are delicious. She also has a one-acre plot of land at home where she grows her own produce.  Jealous!
 

VEGAN ROASTED CAULIFLOWER WITH TUMERIC


I adapted the recipe to use olive oil instead of safflower and added a bit of curry to the mix.  
 
 
Enjoy!
Related Posts Plugin for WordPress, Blogger...